
FFmpeg for common media tasks - converting, cutting, splicing, splitting, merging and more
Learn how to use the powerful FFmpeg tool in command line to convert videos, mux streams, resize videos, downsample audio, reduce quality etc


Digital media consumption is an essential part of our lives today. You might use your digital camera or smartphone to take videos that you later decide to send to someone or keep them saved on your hard drive. But most new smartphones, by default record videos in high resolution and high bitrate. You may not want to save the videos or send them in that same format. Video conversion software is costly. The free ones with a graphical interface often don't get the job done. This is where FFmpeg shines. It's free and easy to use. If you can type on a keyboard, you can definitely use it (and you should).
Installing FFmpeg
FFmpeg is available for most operating systems for free. For operating systems with a proper package manager, the package is likely distributed via their default repositories.
Linux Distributions
On most Debian-based distributions, such as Ubuntu, Linux Mint and Pop OS, you can run sudo apt-get install ffmpeg to install the package. For Arch Linux, you can use sudo pacman -S ffmpeg .
For other distributions, you can easily find instructions to install FFmpeg using the respective package managers. This might require you to add some repositories to your package manager.
macOS
macOS doesn't come with a package manager but there are two popular package managers that you can install: Homebrew and MacPorts. If you don't have either, I recommend installing one of them.
Homebrew: brew install ffmpeg
MacPorts: port install ffmpeg
If you don't want to use any package manager, you can download a static build from this link. After downloading, extract the archive to find an executable named "ffmpeg". Copy it to /usr/local/bin .
Windows
- Download the archive of static builds from here. If the repository ever goes down, you can find static builds from here.
- Extract the archive and find executables inside (usually inside "bin" folder). We're looking for "ffmpeg.exe", but if you find "ffprobe.exe" and "ffplay.exe", get them too.
- Copy the executables to "C:\localbin". You will need to create the folder.
- Open Windows PowerShell with administrative privileges. You can do this by searching for "PowerShell" on Start menu, right-clicking on the PowerShell icon and selecting "Run as Administrator" or by pressing Ctrl + Shift + Enter with PowerShell highlighted on Start menu.
- Enter the command setx path "$Env:Path;C:\localbin"After this, the executables you copied will be available on your terminal.
Simple video conversion
Let's start with a simple conversion of formats. Let's say your smartphone doesn't support a video file that was encoded in HEVC format and you'd like to convert it to mp4.
ffmpeg -i input_video.hevc output_video.mp4
-i tells that the next thing you type will be the input file name. You can usually drag and drop the file into the terminal after typing until "-i" to get the path in terminal. In such cases, it might look likeffmpeg -i /Volumes/WorkGround/bigfile.mp4 smallfile.mp4
orffmpeg.exe -i "D:\media\camera\bigfile.mov" smallfile.mp4 on Windows
Reducing file size or quality
There are two ways to achieve this. Cameras record at a high bitrate and produce some really big files. You can reduce the bitrate in such cases.
My camera records at a 15M bitrate and I don't need that kind of quality when I share or archive videos. So, I can simply tell ffmpeg to re-encode the video at a lower bitrate.
ffmpeg -i IMG_3019.MOV -b:v 3.5M out.mp4
This sets the bitrate to 3.5M and reduced the file size from 143 MB to 40 MB without any significant quality loss. In fact, the video looks the same. That's pretty good savings and this is even better on bigger files.
Here, -b:v means video bitrate. The option -b is for bitrate and :v qualifies it to say it's video bitrate that you intend to change. If you wanted to change the audio bitrate, you'd use -b:a.
The problem with this approach is that when you deal with lower resolutions, you wouldn't need as much bitrate. In the example above, the video is 1920x1080 resolution. If the video was 640x480, 3.5M bitrate would be a waste of space. So you would want to use a lower bitrate with lower resolutions. Dealing with these calculations can get annoying. This is where the second approach is useful.
ffmpeg -i IMG_3019.MOV -crf 28 out2.mp4
The video size was reduced from 143 MB to 33 MB.
Here, -crf is used to specify the quality preset. The value for this parameter can be a number from 0 to 51, where 0 specifies lossless encoding and 51 specifies worst quality. I used 28 for reduced size and good quality. If you increase this value, you'll get a smaller file but at the expense of bad video quality.
Cutting/Trimming a video
FFmpeg can slice videos with high precision.
ffmpeg -ss 1:02 -to 1:25 -i video.mp4 out.mp4-ss specifies the time at which the video should be cut.-to specifies the time in the source at which the output video should end.
This will re-encode the video. You can choose not to re-encode the video and just trim it. This will finish the process much faster but might lose the accuracy of the trim on certain formats.ffmpeg -ss 1:02 -to 1:25 -i video.mp4 -c copy out.mp4
Here, -c copy (copy codec) will instruct ffmpeg to not re-encode the video.
You can specify the amount of time to trim instead of timestamps.ffmpeg -ss 1:02 -t 23 -i video.mp4 -c copy out.mp4-t option specifies the amount of time to cut
Cuts 23 seconds of the video starting at 1:02 of the source video
ffmpeg -ss 1:02 -to 1:25 -i video.hevc -crf 32 out.mp4
Cuts the video and converts it into mp4 with a quality preset
ffmpeg -ss 74 -t 40 -i video.mp4 ringtone.mp3
Cuts 40 seconds of the video starting at 74s (1:14) of source video and converts it to mp3
ffmpeg -ss 2:02.457 -to 2:45.120 -i video.hevc -crf 32 out.mp4
Cuts a video with higher precision.
Changing resolution
Cameras record at high resolution and you may not need that many pixels in your video. Or you might have come across an artificially upscaled video taking up space unnecessarily. You can use ffmpeg to resize these videos.
ffmpeg -i IMG_3019.MOV -vf scale=1366:768 out.mp4
Here, -vf says that you're going to specify a video filter. The video filter you spcify is scale=1366:768 . scale resizes the video to dimensions specified in the format of width:height . If you wanted a width of 640 and a height of 480, the parameter would be 640:480
To supply just one dimension and have ffmpeg automatically calculate the other dimension proportionally, you can use -1 for the dimension you leave out.
ffmpeg -i IMG_3019.MOV -vf scale=-1:720 out.mp4
This will produce a 720p video. We're only specifying the height here. ffmpeg calculates the height automatically.ffmpeg -i IMG_3019.MOV -vf scale=-1:360 out.mp4
produces a 360p video.
Sometimes, ffmpeg will complain that the dimension it calculated isn't divisible by 2. In such cases, ffmpeg will also show the values it used. Simply add/subtract 1 to the value and re-run the command.
Downmixing audio
You might come across video files, especially movies, that have 5.1 or 7.1 audio. These are only useful for you if you have devices that are capable of outputting the additional channels. If you have stereo speakers or headphones, you can downmix the extra channels down to stereo.
ffmpeg -i movie.mkv -ac 2 out.mkv
Here, -ac (audio channels) specifies how many channels you want in the output. If you want mono audio, you'd use -ac 1 .
You can also remap channels to redirect one channel to another or duplicate channels. But these commands can get very complex and I'm leaving them out of this article.
Muxing and Demuxing
This is a bit advanced and you might get confused at some parts, but don't turn away. Try out the commands and you'll be able to figure it out.
Streams
Let's understand streams first. A video file is a "container". A container can hold multiple files in them. An mkv file of a movie typically contains at least two distinct streams: one audio stream and one video stream. The player plays these two streams together. There can be more than one video stream and audio stream in a single container.
Here's a sample file with multiple video streams and audio streams
It contains 4 video streams and 3 audio streams.
Stream 0: Video
Stream 1: Video
Stream 2: Video
Stream 3: Video
Stream 4: Audio
Stream 5: Audio
Stream 6: Audio
Notice how the stream index begins at 0 and not 1. This is important.
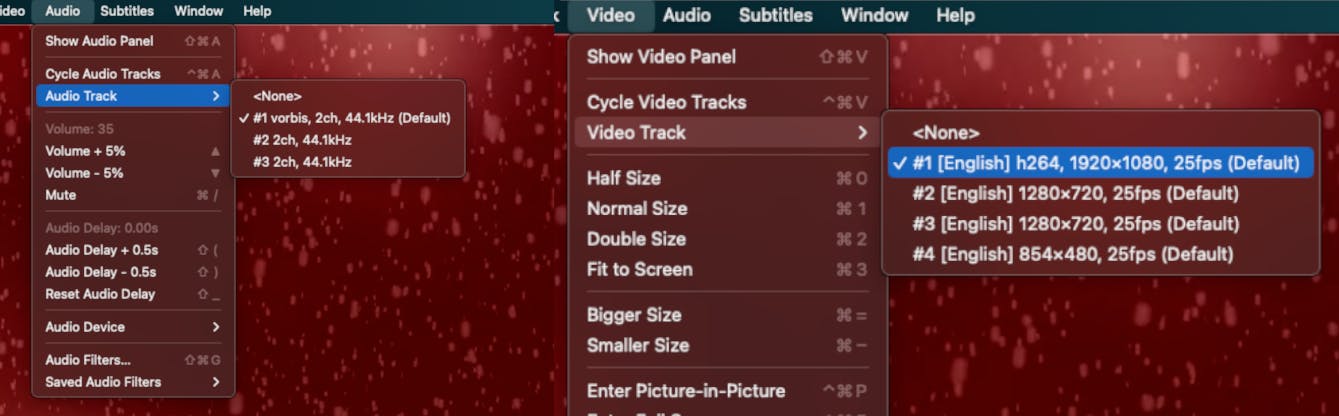
Media players will allow you to select the streams you want to play. If your media player doesn't let you do this, you need a better player.
Muxing two different files in ffmpeg is straightforward. You specify two inputs and one output and ffmpeg will do it for you.ffmpeg -i video_in.avi -i audio_eng.aac video_out.mp4
And if you want multiple audio streams,ffmpeg -i video_in.avi -i audio_eng.aac -i audio_hindi.aac video_out.mkv
What if you want to take one audio stream from a file with multiple audio streams, and combine it with the video stream to produce an output with just one audio stream?
Of course, you can do it in multiple steps with the options aboveffmpeg -i video.mkv audio.mp3ffmpeg -i video.mkv -i audio.mp3 video_out.mp4
But you can also do muxing and demuxing in one command.
The file "video.mkv" has 3 streams.
Stream 0: Video
Stream 1: Audio
Stream 2: Audio
ffmpeg -i video.mkv -map 0:0 -map 0:2 video_out.mp4
-map 0:0 - from input 0's streams, select the 0th stream (which is the video stream)-map 0:2 - from input 0's streams, select the 2nd stream (which is the audio stream)
If you wanted to use the other audio stream, the command would be.ffmpeg -i video.mkv -map 0:0 -map 0:1 video_out.mp4
You can also select streams filtered by their type. The above command, ffmpeg -i video.mkv -map 0:0 -map 0:2 video_out.mp4 can also be written asffmpeg -i video.mkv -map 0:v:0 -map 0:a:1 video_out.mp4-map 0:v:0 - from input 0, filter video streams, and select the 0th stream in the filtered list-map 0:a:1 - from input 0, filter audio streams, and select 1st stream in the filtered list
Multiple Inputs
Consider feeding more than one input with multiple streams into ffmpeg. The first input has 1 video stream and 3 audio streams. The second input 3 video streams and 2 audio streams. We're going to write the command to take the third audio stream from the first input and the second video stream from the second input to create an mp4 file.ffmpeg -i Video0.mkv -i Video1.mkv -map 0:a:2 -map 1:v:1 out.mp4-map 0:a:2 The first 0 selects all streams from input 0, a filters audio streams from them and the "2" select stream index 2 from the filtered streams.-map 1:v:1 The first 1 selects all streams from input 1, v filters video streams from them and the "1" selects stream index 1 from the filtered streams.
Here's an illustration of it.
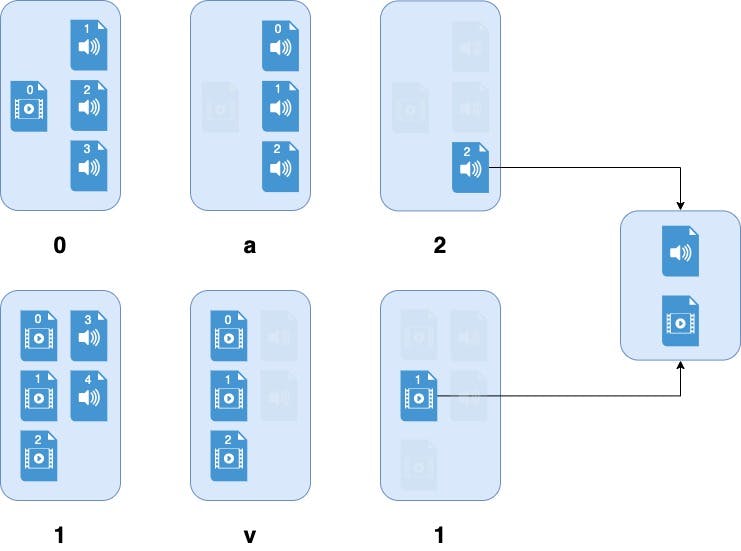
The command is the same as (without selecting streams by type)ffmpeg -i Video0.mkv -i Video1.mkv -map 0:3 -map 1:1 out.mp4
Let's try muxing and demuxing with the sample file I provided above.
This file was created using the following command.ffmpeg -i Video.mp4 -i Video720_lowq.mp4 -i Video720_highq.mp4 -i Video480.mp4 -i Audio1.mp3 -i Audio2.mp3 -i Audio3.mp3 -map 0:v -map 1:v -map 2:v -map 3:v -map 4:a -map 5:a -map 6:a -to 20 out.mkv
To extract the 420p stream and the second track into an mp4 file,ffmpeg -i out.mkv -map 0:v:3 -map 0:a:1 420.mp4
Here one input is provided and the streams are selected from that input.-map 0:v:3 selects the 4th (indexing starts at 0) video stream-map 0:a:1 selects the second audio stream
To extract just the 720p video stream and all audio streams into an mov fileffmpeg -i out.mkv -map 0:a -map 0:v:1 720.mov-map 0:a selects all audio streams (not specifying a stream index after "a")
To extract the 720p stream, 480p stream, first audio stream and third audio streamffmpeg -i out.mkv -map 0:a:0 -map 0:a:2 -map 0:v:1 -map 0:v:3 muxed.mp4
Hope you learned something new here. And I hope this helps you use proprietary software less. I'll write another article with more advanced options and complex filters. Feedbacks are welcome.